|
The Art of Demomaking - Issue 10 - Roto-Zooming by (25 October 1999) |
Return to The Archives |
Introduction
 |
|
Welcome back for another week's worth of free knowledge :) Hope you appreciate it. This time I will tell you about roto-zooming, and the various different ways of doing it. You will also learn about basic 2D geometry, and also about profiling and visual performance testing. |
The Theory Behind Roto-Zooming
 |
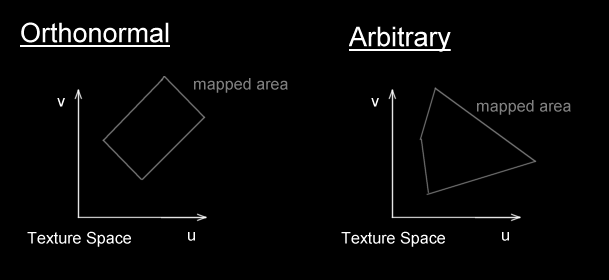
Just like all the previous effects, roto zooming is really easy once you understand how it works. The basic idea is that you select an area in texture space that you will have to map onto the screen. The area you choose in texture space can have any shape, but things are much easier if you select a 4 sided polygon. Another possible simplification is to perform orthonormal roto-zooming, which means you map your texture from a rectangular area.  Orthonormal roto-zooming is the easiest to code, and arbitrary roto-zooming looks better. But it all depends what you want your effect to look like. Orthonormal rotozooming preserves the aspect of the texture, so it's probably best to use this method if your texture contains some text that needs to be read. Arbitrary roto-zooming makes the texture look wobbly, not very realistic, but somewhat cooler. We'll use orthonormal rotozooming. We only need the coordinates of 3 points in texture space: A, B and C.
The only difference with arbitrary roto-zooming is a extra interpolation. And we need the coordinates of 4 points in texture space: A, B, C and D.
All we need to do now is select the area of texture space we wish to map. |
2D Rotation
 |
|
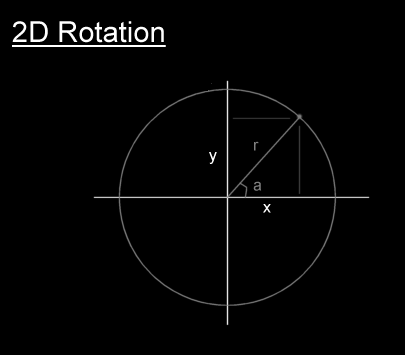
Since we want to rotate and zoom our rectangular area of texture space, we need to know a bit about rotating 2D points. As I said in a previous tutorial, we use the sine function to do this. Given a radius, and a rotation angle, we can find the coordinates of our rotated point given the following equation:
 This is all we need for our roto-zoomer, but you may also want to know how to rotate and arbitrary point around the origin. This is done with the following equation:
If you wish to rotate point A around another point B, simply translate both points so that B is at the origin. Then rotate A and translate it back by the same amount. |
Dynamic Texture Mapping
 |
|
This week's effect is a form of dynamic texture mapping. This means that we recompute our (u,v) coordinates at each pixel every frame. In the case of a roto-zoomer this is quite quick, since there is not much computation to perform. You could drastically boost the visual quality of this effect by implementing simple bilinear filtering and mip-maping. There's nothing new there, it's just a question of sitting down and doing it. Another thing I should point out is the implementation of block rendering. Indeed as i mentioned in the tutorial about cache performance, this technique makes sure the effect runs at a constant frame rate, independent of the rotation angle. I've coded this for you, just because a roto-zoomer without block rendering is not worthy ;) |
Profiling
 |
|
A very important aspect of coding effects is getting them to run quickly. So obviously optimisation is needed. Now usually with a bit of experience you can tell, or at least guess where your program spends most of it's time and optimise the algorithm and code for that specific part. For those of you with less experience, finding the bottleneck of the code can be difficult. And that's where profiling comes in to the rescue. Profiling is the process of running the program and timing each and every procedure in the program. So the output of the profiled program is a table that contains the number of times each procedure was called, and much time was spent in each one. To enable profiling with DJGPP, simply compile with the -pg switch. Also remember not to use the -s switch. So type this at the command line:
Then simply run the program. Let it run a few seconds so the program can be profiled. Then simply type:
This creates a file called list.txt that contains all the profiled information. The first few lines look like this:
Right, now we know this program is wasting most of it's time waiting for the vertical retrace. We also know the only procedure worth optimising (writing in assembler maybe) is the BlockTextureScreen one, and all the others are not worth bothering with. Profiling is especially useful when your main loop calls more than one procedure. It seems a bit stupid to profile this specific program, since you all could have told me which procedure to optimise without even profiling ;) |
Visual Performance Testing
 |
|
Another simple technique to test the performance in real time involves a tricky hack with the palette. Basically we set the background colour to white while we are drawing, and change it back when we've finished. You will then see that the top part of the border is white, and the rest is black. The bigger the white portion, the slower the main loop is running. So you will notice drops in the FPS when the white part of the border gets much bigger. This happens for example without the block renderer, when the angle is approximately 90 degrees. Another thing I just noticed with this method were the random jerks in the FPS. The white area sometimes covers the entire screen under Win98. This is extremely frustrating since it doesn't happen in good old DOS. I should have known that windows would make the program randomly miss vertical retraces. The answer would be to use Direct Draw, or run the program in DOS. |
Final words
 |
|
Roto-zooming can be pretty boring on it's own, but is very often at the base of the best looking effects. This particular implementation is quick, but has a lot of room for visual improvement. As for profiling, it can be very helpful in complex programs to help you determine what your program is doing and how long for. It's also useful for finding unexpected bad performance in some procedures. Well, this time I've absolutely no idea what's going to happen next week. The only thing I know is that there will be at least one or two more issues of this column. You can download this week's demo and source code package right here (128k) Happy Coding, Alex |