|
Radiosity In English - Form Factor Calculation by (03 June 1999) |
Return to The Archives |
Introduction
 |
| In this document, I will attempt to explain the details of form factor calculation. I’ll start with a physical world example; something you should easily be able to wrap your imagination around. I’ll discuss the important relationships between the working pieces and how they fit into the real world. Following that, I’ll discuss how the calculations actually work, step by step, and what everything means. And finally, I’ll tie these pieces together with the actual radiosity equation (in proper notation) so you’ll have a better chance at understanding the other radiosity references out there. |
A Physical World Example
 |
| We’ll start with just two surfaces. Surface ‘I’ is emitting light and surface ‘J’ is not. These surfaces are quite large, say 8-square feet each and they’re only an inch apart, facing one another. Also, since we’re dealing with radiosity here, everything is typically considered a "perfect diffuse reflector". This means we can assume that surface ‘I’ is emitting an equal amount of light from all points on its surface (this is very important.) |
Energy Transmission
 |
Our task is to figure out how the light being emitted from surface ‘I’ will affect (be received by) surface ‘J’. Rather than speaking in terms of
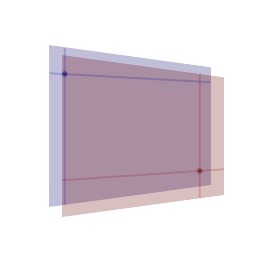
surfaces, let’s start by considering two points, one on each surface: Fig 1: Two points on two surfaces, each point defined by the intersection of similarly colored lines I have purposely chosen two points that are far apart. Given two surfaces of eight square feet each and only an inch between the surfaces, the relative angle between them should be quite extreme. That is, if you were to connect the two points with a piece of string, and look at the angle between the line of string and each surface’s normal, the angle should be quite large. The angle between these two points (ignoring all other points on the surfaces for now) is important because majority of the energy emitted by any point on a surface is emitted in the direction of the surface’s normal. In the case of our two example points, only a fraction of the emitted energy should reach the destination point. In short, the greater the angle, the less energy transmitted. This is also true for receiving energy. The greater the angle of the incoming energy, the less received. So we must take both angles into account when we calculate our form factor. If you only consider these two points, very little energy will be transmitted and received. The receiving point, however will still be brightly illuminated since it will receive most of its energy from the point on the transmitting surface directly across from it. Extending energy interaction between the two example points to the two example surfaces, it becomes quite clear that we’ll need to iterate through two infinite loops. The first loop for each point on the receiving surface, and the second (inner) loop for each point on the transmitting surface, a task that would challenge any computer. |
Making it Possible
 |
|
Fortunately, it is not necessary to iterate through the infinite set of points on the surfaces. We could subdivide each surface into a finite set
of smaller surfaces (patches.) These patches would act as "sub-areas" of the entire surface, giving us the ability to calculate the interaction
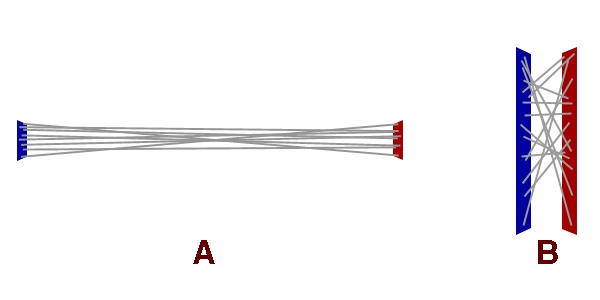
between large groups of points as a whole, rather than individually. This would produce some very accurate results, provided our subdivisions were able to accommodate one criterion: the area of two interacting patches must be relatively small, when compared to the distance between them.  Fig 2: A random sampling of point interactions between two sets of surfaces In the example above, the gray lines represent a small set of interactions between two points. In Figure 2, example B, it is clear that the lines are very chaotic. However, looking at Figure 2, example A, the lines are much more uniform because the relative difference in angle from line to line is reasonably small. This uniformity comes from the fact that the patches are relatively small when compared to the distance between them. By meeting this criterion we can guarantee that all points on the receiving patch will have nearly the same relative angle to all points on the transmitting patch. Given this, we can treat each patch as an area of the surface and calculate the interaction between two patches only once. Keeping the relative angle between patches low allows us to minimize error. Other than our minimal error (which we’re willing to accept in trade for the lack of two nested infinite loops) the only difference is area. Rather than a single point transmitting its energy directly to a single point on another patch, we’re transmitting the energy over an AREA. And an AREA is receiving this energy. This is where the differential areas come in... |
Differential Areas
 |
|
Differential areas are calculated by simply dividing the transmitting patch’s area by the receiving patch’s area. Doing this will result in a
value that can be used to scale the amount of energy leaving the transmission patch and arriving at the receiving patch. Of course, that energy needs to come from somewhere. The initial source of the energy for a transmitting patch is, of course, its surface. To decide how much energy a patch is to receive from its surface, you simply divide the patch’s area by the surface’s area. This fraction can be used to scale the surface’s energy down to size for a patch. |
Doing The Work
 |
Time to analyze our requirements. To shoot energy from one patch to another, we need the following:
We’ll begin by determining the relative angles. This is the major factor in determining how much energy is transmitted and received. To determine this, you simply perform two dot products, each of the surface normals with ‘V’. Be sure to use unit vectors and make sure your results are always positive. If you multiply these together, you’ll have the "differential angle", which will always be a positive value less than 1.0. We’ll need to consider distance in the equation since the farther away a patch is, the less energy it will receive. We aren’t doing this to account for distance attenuation. We’re doing this because a transmitting patch emits energy to everything on the front side of its plane. Everything that’s not occluded, that is. You can think of a patch as a 180-degree view frustum. In much the same way that objects appear to shrink in a perspective view as they get farther from the viewpoint, receiving patches will occupy less "visible area" as they get farther from their emitting neighbors. To complicate matters (only slightly) it is important to note that, even though the patch may be square, the patch uses a "hemispherical" emission pattern. What I mean by this, is that a patch emits the most energy along its surface normal, and as the angle increases towards 90-degrees, that energy emission falls off. The direction doesn’t matter, just the angle. To account for the variation of energy over distance and angle of emission, simply multiply PI by the square of the average distance between the patches. To apply this to your existing answer, simply divide your differential angle by this amount. At this point, we need to consider occluders by calculating a "visibility scalar." If anything is occluding these two patches, we need to know how much (ranging from 0.0 to 1.0). Most applications simply test a few rays between the two patches, and calculate the visibility scalar based on how many rays intersected an occluder. Some applications are content to test only one ray and consider them completely visible (1.0) or completely occluded (0.0). From experience, I can say that the more accurate your visibility scalar is, the more robust your results will be. Your shadow edges will be much cleaner edges with few jaggies. Since this is a scalar that represents how much of the energy makes it all the way to the receiving patch, simply multiply your running total by this amount. Finally, we need to take our differential area into account. The differential area is simply calculated by dividing the receiving patch’s area by the transmitting patch’s area. Multiply your running total by this value. At this point, we have our final result. You’ll need to calculate reflection and illumination for the receiving patch so that the receiver can eventually contribute its reflected energy back to the scene. |
The Radiosity Equation
 |
|
At this point, you should have a pretty solid understanding of how to calculate how much energy to transmit from patch to patch in a scene.
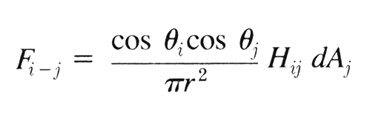
I’m going to attempt to solidify this knowledge by linking it to the kind of stuff you’ll see in other references and books. The standard equation looks like this:  Fig 3: The standard form factor equation according to Cohen & Greenberg (subscript i refers to the transmission patch and subscript j refers to the receiving patch) Since we’ve avoided the nested infinite loops, we can simplify this quite a lot:  Fig 4: Simplified form factor equation for differential area patches If you’re a math wizard, you can probably just skip to the next section now. If you refer back to the previous section, you should be able to follow this Greek stuff. They refer to the resulting form factor (for transmission patch ‘i' and receiving patch ‘j’) as Fi-j. The cosines perform the differential angle calculation. We’re using dot products since the dot product results in the cosine of the angle between two vectors, which is exactly what is needed. To account for distance, we have the division by pi r2 (‘r’ being the distance.) Following that, we apply the relative visibility between the two patches (Hij). And we top it all off with a heavy helping of differential area (dAj). |
Dealing with the Numbers
 |
|
The first thing you’ll notice when writing your first radiosity processor is that your numbers won’t seem to make sense. They’ll probably
seem way out of whack compared to your current rendering architecture. You must remember that we’re dealing with energy here, not
standard lighting. Our range of possible values is not limited to [0…255]. The trick is going to be finding an adequate method for mapping the energy values into a displayable range. This is much trickier than it may seem, so I won’t get into much detail other than to explain what’s happening and point you in the right direction. The real world doesn’t know anything about lighting value limits. It just throws energy around and your eyes have to adjust to your environment. Too little energy and you can't see. Too much energy and you can damage your retinas. There is no "upper limit" of light; the physics that control the universe don’t clamp light values to 255 if they get too high. You’ll need to consider your scene and scale your values into range as appropriate. In doing this, you may still have to clamp any minor overflow into your displayable range. There are papers, books and other references that discuss this material. Seek and you shall find! |
Closing
 |
|
I certainly hope you found this document useful. I rather enjoyed writing
it (as I did with its predecessor.) - Paul Nettle |
|
Article Series:
|