|
Terrain Texture Generation by (30 April 2001) |
Return to The Archives |
Introduction
 |
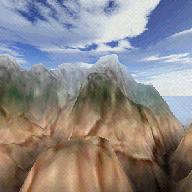
As everyone who is busy with his terrain engine will someday want to use more
than one texture for the whole scape, I also stumbled across the problem of how to
get snowtop mountains and sandy beaches out of some textures for my terrain. The
solution was named "procedural texture generation", but there wasn't much stuff on the net
for that topic (on http://www.flyingislands.co.uk I found an open source engine called
LOD_Program by Nicholas Anderson from which I took some code snippets
I'll use and explain here).
. I haven't done anything in this field until recently a
thread here on flipcode made me work again. So how does the whole technique
work? Basically you'll keep the method of using one texture for the landscape
mesh, but this time the texture looks like your scape viewed from top. It's a
texture which is totally adjusted to the heightmap... In general, procedural
texture generation is nothing other than creating textures by a specified
procedure. In our case this procedure is... described next =)
|

|
Tech
|
|
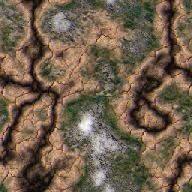
Our task is: Take at least 2 bitmaps and a heightmap and return a new generated
texture which looks like the heightmap, but with the colors exchanged to the
pixels in those bitmaps we took. The bitmaps are whatever you want them to be,
but in our case they represent diffrent attributes of our landscape (rock,
grass, snow etc)... Ok, we now do the following: What do we have now? We have at least two color values (from our bitmaps), and we have a value for the actual height at this postion on the map. Now comes the tricky part: We'll divide our landscape into different regions, based on their height. Say the lowest point in our landscape is 0 and the highest is 256 then we could go for: Region1(Snow) : 256-192 Region2(Rock) : 192-128 Region3(Grass): 128-64 Region4(Sand) : 64-0 Ok, what's this? The scape is divided into 4 different (height-)regions, all of a size of 64. I took snow and rock for the mountains, grass for plains and sand for beaches. Therefore we'll now take 4 textures instead of two... Ok, what now? The next thing we need is the basis for the whole process: A function, which returns a percentage count! Remember, I told you that we're mixing textures, not cutting them into pieces and glue them together. Ergo sum, if we leave the area of Region1(Snow) we will fade the color from white(Snow) to grey(Rock), so we have to check if the height is low enough and how much % of snow is still visible. Note: At the "edges" the percentage of a texture drops to 0%, so e.g. the percentage for snow at or below 192 is 0% (not visible) and at 256 it's 100%!
Note: If you change the range of 64 (e.g. you divide the height into 2 instead of four regions) you'll also have to modify this function (exchange the two 64.0f to the new range)! The concept is following: As you probably already noticed, texfactor returns a percentage count. The input which is needed is So, what we're doing per pixel is to check "every" texture for it's presense expressed in % at this location. So I again sum up: That means our texture generation function could go like this:
Ok, I admit it's bad style and it only handles 4 textures... anyway, the magic happens in those three lines where new_r, new_g and new_b are calculated. Since we have a percentage for each textures visibility, we now just have to multiply the colors of our textures with the factor and add all of them together. E.g. say we're at height 256 , tex_fact[0] would return 1.0f (100%), and all other tex_fact are 0.0f (0%). Therefore the new r value is 100% of the r value of tex[0]... same goes for new_g and new_b, resulting in 100% of white (since the top of our mountains have a snow-white texture). Another example: At height 224, we get 50% snow and 50% rock, resulting in some light-greyish color to be written... Well, that's all! Have phun & happy coding! |
|
Source
|
|
Ok, this is the source of a little prog which originally was intended as a
blending tool, but the code works with the same principle as described. It takes
a heightmap and two bitmaps, the output is called final.bmp... the source is a
little undocumented, but theres not much more than I already described here. Download The Blender Source Code: article_terraintexture.zip (6k) |
|
Special Thanks
|
|
I would like to thank:
Nicholas Anderson, for without his engine this tutorial might never exist. Eldon Rivers, who made me aware of some bugs in the bitmap class: The final images did colorcycles when multiple load's and save's where done on them because the written bytes hadn't been correctly aligned. PMeloy, who also made me aware of a little, but nevertheless significant bug: There was a missing abs() which affected the final output. Thanks guys! |
|
|