|
Raytracing Topics & Techniques - Part 3: Refractions and Beer's Law by (13 October 2004) |
Return to The Archives |
Introduction
 |
|
When you are deep in a raytracer project, you start looking at nature in an odd manner. I've noticed the same when working on a polygon engine: Building interiors suddenly appeared to have lots of 'polygonal detail' and 'wonderfully subdivided splines', but also 'poorly placed portals' and 'totally unrealistic soft shadows'. While working on the raytracer, I experienced something similar. A glass of cool beer is very hard to render correctly. It has got a transparent hollow cylinder made of glass, a yellow substance inside it, and a highly complex matter near the top, consisting of tons of small spheres, with quite complex behaviour. On the other hand, perhaps you have rendered too much if you start looking for suitable primitives and rendering challenges in a glass of beer... In this article I would like to explain how to trace refracted rays. This involves spawning new rays at the point of intersection and calculating the new direction. Besides this I will explain Beer's law: How light falls off inside a substance. And finally, I would like to show how easy it is to get good anti-aliasing using a raytracer, and how to make it fast. |
|
Refractions
|
|
Refraction is illustrated in figure 1. Notice how the rays bend at the surface of the primitve, and how they pass through one point behind the primitive. Objects behind this point will appear flipped and mirrored because of this. How the rays are bent at the surface of the primitive depends on the refraction index of two materials: The material that the ray is in before it enters the primitive, and the material that the primitive is made of. Some examples: Air and vaccuum have a refraction index of about 1.0; water at 20 degrees Celcius has a refraction index of 1.33. 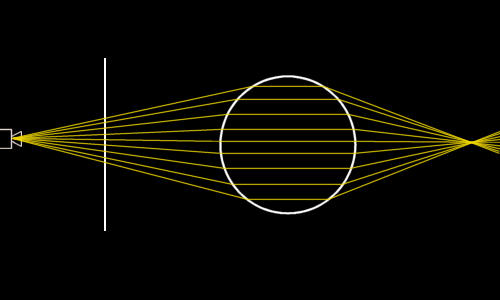 Fig. 1: Refraction Regarding the exact maths for refraction, I'm not going to go into detail here. Instead, I would like to point to an article that Bram de Greve wrote on the subject. The pdf of this article is available at the end of the article, and will also appear separately at your favorite game coding site. You can view it here. The code below should look pretty familiar by now. It constructs the refracted ray, traces it (recursively of course) and adds the resulting color to the ray that spawned the refracted ray. One note: The normal is multiplied by the value in the variable 'result'. This is a value that is filled by the intersection code for each primitive. It can either be 1 or 0, denoting a hit or a miss. There's a third option though: -1 means hit, but from within the primitive. This means that the origin of the ray that hit the primitive was inside the primitive itself. This is quite important: When a ray hits a primitive from the outside, basically it doesn't hit the primitive, but the matter around it. And therefore, the normal is reversed.
I have added a slightly more interesting scene to the raytracer to make the effect of refraction visible. It's included in the third release of the sample raytracer (see link at the end of the article). Here's a picture showing of the refraction code: 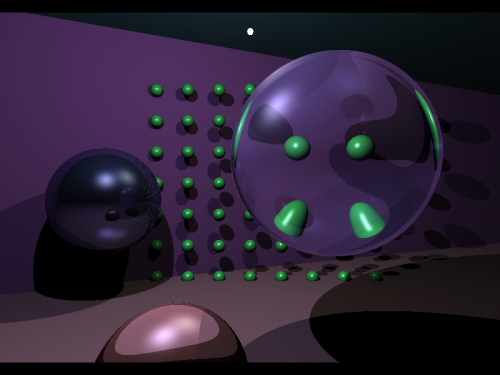 As you will undoubtedly have noticed, the raytracer now takes several seconds to render this image. This is only logical: There are a lot of primitives in the scene now, and every ray is intersected with every primitive to find the closest intersection point. Obviously, there's a better way to do this. We will use a spatial subdivision later on to limit the amount of intersection tests. |
|
Beer's law
|
|
In the picture on the previous page, you can see that the sphere is blue, and so the refracted image is also slightly blueish. This is because the color returned by the refracted ray is multiplied by the primitive color. The same happens to reflections and diffuse and specular lighting. Many raytracers use the same technique for refracted rays. This is not entirely logical nor correct. Imagine a pool with a colored substance (water mixed with blue ink, for example). At the shallow end of the pool the water is just 10 cm deep; at the other end it's over a meter. If you look from above to the bottom, it's rather obvious that at the shallow end, the bottom will be far less affected by the color of the ink than at the deep end. The effect of the colored medium is stronger over longer distances. This effect is called Beer's law. So, let's obey it. Beer's law can be expressed in the following formula: light_out = light_in * e�(e * c * d) This formula is primarily intended to calculate the light absorbance of a substance that is dissolved in water. 'e ' is some constant that specifies the absorbance of the solvent at hand (to be precise, the molar absorbtivity with units of L mol-1 cm-1); 'c' is the amount of this stuff, in mol L-1. 'd' is the path length for the ray. This is all extremely interesting if you want to study the behaviour of light in real materials, but if you just want the light to fall-off in a material that is not 100% translucent, basically all you're interested in is this part: light_out = light_in * e�(d * C) Where d is the path length, and C is some constant indicating the density of the matter. Lowering it will make light live longer while travelling through the substance. Absorbance and thus transparency need to be calculated per color component. This leads to the following code:
Here's the result: 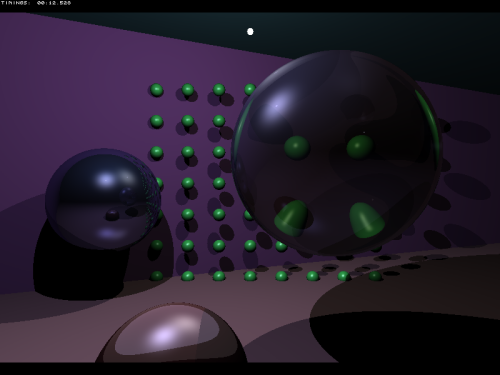 Now I have to admit that this does not have an enormous impact on the image quality for the sample scene that we are using at the moment. However, once you start working with more complex materials, it can make quite a difference. And of course, there is the piece of mind that comes with an approach that is at least linked to a physical phenomenum. Many raytracers use a simpler approach: Each material is assigned a 'reflectance' variable, which is multiplied with the color that the reflected ray returns, and a 'refractance', which is multiplied with the color that a refracted ray returns. For refracted rays, this doesn't work well: Every refracted ray is affected twice as it enters and leaves the primitive. And, travelling through a thin block will result in the same falloff as travelling through a rather thick block. The biggest problem though is that intuitively it doesn't feel right: Ray intensity doesn't drop at the surface of a primitive; it drops inside the primitive. By the way, I have the same doubts with the lighting model: Diffuse shading combined with reflected specular shading feels like a hack, and in fact it is. Many raytracers even add an ambient component, which is simply added to the melting pot, just to cover the lack of global illumination. I guess I'll have to live with hacks to get a reasonable rendering speed, just because nature is incredibly complex... |
|
Supersampling
|
|
OK, on to something lighter. :) Suppose we replace the code that spawns a ray (in the Engine::Render method) with the following code:
This code fires 16 rays through each pixel, and averages the result. The resulting image is anti-aliased. Nifty. However, it takes ages to render, and that's logical, since basically it's now rendering an image that's 16 times larger. There's an easy way to have the best of both worlds though: Speed and quality. Well almost. Perhaps you noticed that the raytracer returns a pointer to a primitive: This is the primitive that was hit by the primary ray. When we modify the ray spawn code so that it only traces 4x4 rays when we encounter a new primitive, performance improves dramatically:
This code runs about as fast as the version without supersampling, which is logical, as the extra code is only used at primitive boundaries. It's not as good as full supersampling though: Both issues are quite easy to resolve. The raytrace method as it is now returns a pointer to a primitive, but you could also choose to return some other number, based on the primitive pointer, combined with reflected primitives and the number of visible lights. This would smooth out reflected primitive boundaries and shadow egdes. Detecting horizontal primitive boundaries is also easy: Just store an array of pointers to primitives for the previous line. Now you can compare to the previous pixel on the left, but also on the previous line. Obviously, the more boundaries you detect, the slower the code gets. But it will result in smoother images, at quite a low cost. |
|
Final words
|
|
Well this pretty much concludes the basics of raytracing. I hope it's clear by now how intuitive raytracing is: After all it's just a bunch of rays doing funny things. It's also pretty close to the 'real thing', algorithm-wise. There's lots more to explore though. First of all, there's the issue of performance: Raytracing quite quickly becomes slow, as you undoubtedly have noticed. So far I payed little attention to this issue. The other thing is realism: The closer we get to the way light behaves in the real world, the better the results will be, obviously. Especially interesting is the topic of global illumination. This will replace the 'ambient shading' used in other raytracers with something that is far more realistic. Both could be taken to extremes, but sadly they are more or less mutually exclusive. You can do real-time raytracing, but I doubt that anyone will do a real-time photon mapper in the next couple of years. And on the other hand, if you thought refraction was slow, wait till you see my photon mapper. :) Next up: Spatial subdivisions. That's all for today, see you next time! Jacco Bikker, a.k.a. "The Phantom" Link: Raytracer v3 Reference: Reflections and Refractions in Raytracing by Bram de Greve |